
As Amazon Associates, we earn from qualifying purchases. This means we may receive a small commission at no extra cost to you if you click through and make a purchase.
Under-extrusion, inconsistent layer deposition, and persistent filament grinding often signal mechanical wear inside a 3D printer toolhead. When basic maintenance and cold pulls fail to resolve ongoing flow problems, installing a complete Flashforge AD5X Extruder assembly is the most direct path to restoring factory print reliability. This replacement unit is engineered specifically for machines operating on the updated V2 toolhead platform. Choosing this assembly is the right move if your current printhead has suffered motor gear fatigue, thermal throat damage, or chronic clogs, provided you have confirmed that your machine uses the V2 mounting geometry. Because Flashforge created two distinct extruder hardware revisions that are not interchangeable, verifying your printer version is mandatory before swapping components.
This factory unit delivers a complete drop-in package equipped with a high-flow hotend capable of meeting the volumetric demands of high-speed printing. In this breakdown, we examine the official flashforge ad5x extruder specs, explain the structural details needed to ensure flashforge ad5x extruder v2 compatibility, and outline the proper ad5x extruder assembly setup procedure. We also detail how different nozzle diameters handle standard versus composite filaments, discuss critical usage practices to prevent internal gear damage, and contrast this component against alternative extruder designs from other printer ecosystems.
What You Get With the Flashforge AD5X Extruder
Flashforge AD5X Extruder


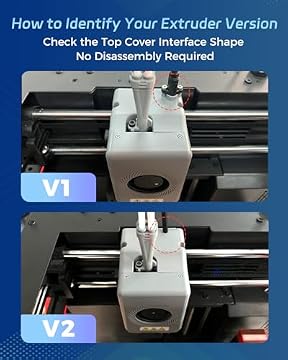

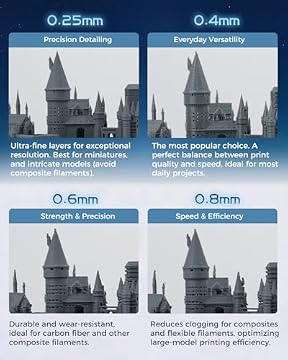

Photographs published on the Amazon listing.
The replacement assembly arrives as an integrated package from the manufacturer, eliminating the tedious process of transferring motors, tensioners, and thermal sensors from an old carriage.
- Entire Extruder Assembly configured specifically for V2 chassis mountings.
- Pre-installed 0.4 mm high flow hotend kit capable of volumetric throughput up to 32 mm³/s.
- All-in-one integrated hotend design combining the heat sink, heater block, and precision metal tube.
- Complete internal drive gear mechanism calibrated for standard 1.75 mm printing materials.
- Integrated wiring harnesses for straightforward connection to the toolhead distribution board.
Key Specifications
Component Attribute
Manufacturer Specification
- Part Designation
- Entire Extruder Assembly (Extruder V2)
- Manufacturer
- Zhejiang Flashforge 3D Technology Co., Ltd.
- Pre-installed Nozzle
- 0.4 mm high-flow hotend kit
- Maximum Flow Rate
- Up to 32 mm³/s volumetric throughput
- Supported Nozzle Diameters
- 0.25 mm, 0.4 mm, 0.6 mm, and 0.8 mm
- Standard Filament Compatibility
- PLA, PETG, ABS (0.25 mm and 0.4 mm nozzles)
- Composite Filament Compatibility
- Carbon fiber, glass fiber (0.6 mm and 0.8 mm nozzles)
- Package Dimensions
- 7.8 x 5.35 x 2.52 inches
- Total Item Weight
- 14.9 ounces
- Version Interoperability
- V1 and V2 are strictly not interchangeable
Copied from the Amazon listing. These figures were not measured here.
V1 Versus V2 Hardware Compatibility and Identification
The most critical aspect of sourcing a flashforge ad5x replacement extruder is matching the exact hardware generation of your printer. Flashforge manufactures two separate iterations of this assembly: Version 1 and Version 2. These two hardware designs are mechanically and structurally incompatible. Attempting to install a V2 extruder onto a machine designed for the earlier toolhead causes physical alignment failures and connection mismatches, making verification the primary step before starting any repair work.
Fortunately, identifying your version does not require complete printer disassembly. The manufacturer distinguished the two hardware generations by altering the top cover interface shape. By inspecting the exterior profile where the top cover mates to the toolhead housing, you can visually determine whether your printer houses the earlier iteration or the revised V2 architecture. If your machine features the original configuration covered in our ad5x extruder v1 evaluation, this replacement unit will not mount correctly to your carriage.
Taking a moment to examine the top interface prevents unnecessary downtime and return logistics. For operators running the V2 chassis, this assembly functions as an authentic drop-in component that lines up with factory screw patterns and harness plugs. Maintaining version parity ensures that the drive gears, stepper motor calibration, and cooling duct pathways align seamlessly with the rest of your motion system.
All-in-One Hotend Design and High-Flow Throughput
A core mechanical highlight of this assembly is the all-in-one hotend structure. Traditional hotends often rely on threaded heat breaks, separate heater blocks, and detachable nozzles held together across multiple mechanical joints. In contrast, this unit integrates the heat sink, heater block, and a precision metal tube into a unified mechanical structure. This direct connection ensures rapid thermal transfer during heat-up phases and promotes efficient heat dissipation across the upper cooling fins, significantly reducing the likelihood of heat creep during lengthy print jobs.
Thermal stability is paired with high volumetric capability. The pre-installed flashforge ad5x 32mm3/s hotend kit is engineered to melt and push plastic fast enough to keep up with modern acceleration rates. When running standard 0.4 mm profiles, an ad5x high flow hotend design ensures that volumetric flow restrictions do not starve the nozzle during high-speed travel moves. This enables smooth exterior surfaces, dense infill bonding, and sharp perimeter transitions without requiring manual flow-multiplier inflation.
The integrated metal tube design also simplifies routine maintenance. Because the melt zone and thermal barrier are precisely aligned at the factory, users avoid common assembly errors such as improper nozzle seating, which frequently causes filament to seep between the heat break and heater block on conventional designs. This unified construction stabilizes the extrusion line across long production cycles on machines like the flashforge adventurer 5x.
Matching Nozzle Sizes to Standard and Composite Filaments
While the assembly ships with a standard 0.4 mm high-flow nozzle pre-installed, the system supports a broader ecosystem of flashforge ad5x nozzle sizes ranging from 0.25 mm up to 0.8 mm. Selecting the appropriate diameter depends entirely on your target surface resolution and the abrasive qualities of your chosen print material. The smaller 0.25 mm and 0.4 mm orifices are explicitly recommended for standard polymers such as PLA, PETG, and ABS, where crisp details and clean dimensional tolerances are prioritized.
For industrial materials, switching to larger nozzle orifices is mandatory. The manufacturer specifies that 0.6 mm and 0.8 mm nozzles are ideal for composite filaments containing structural reinforcements like carbon fiber or glass fiber. These composite filaments contain microscopic fibers that easily clump and bridge across small orifices, resulting in stubborn mechanical clogs inside sub-0.5 mm nozzles. The broader melt chambers of the 0.6 mm and 0.8 mm configurations allow composite fibers to pass unobstructed, minimizing backpressure against the drive gears.
In addition to mitigating clog risks with composite materials, running a 0.6 mm or 0.8 mm nozzle maximizes the unit’s 32 mm³/s melt capacity. Larger extrusion widths allow the machine to deposit wider perimeters and taller layer heights, drastically cutting total print times on large functional parts while maintaining strong structural integrity between successive plastic layers.
Setup Procedures and Proper Filament Handling Guidelines
Executing an ad5x extruder assembly setup requires methodical mechanical installation followed by mandatory software calibration. Once the physical unit is secured to the toolhead carriage and the wiring harness is seated, operators must run an automated bed leveling calibration routine through the machine firmware. Because microscopic height variations exist between individual hotend manufacturing tolerances, skipping bed leveling after replacing the extruder assembly risks nozzle gouging on the build surface or poor first-layer adhesion.
Equally critical to the longevity of this hardware is strict adherence to the manufacturer’s filament loading and unloading instructions. The listing explicitly states that users must always load and unload filament through the printer’s automated screen interface rather than pulling filament out manually. The drive gears inside this assembly maintain precise tension against the filament path. Tugging a spool or manually yanking melted filament out of the top guide introduces severe back-tension and can strip, misalign, or clog the drive gear teeth with sheared plastic fragments.
Following the automated interface routine ensures the hotend reaches the necessary retraction temperature before the stepper motor initiates a controlled reverse sequence. This process preserves the clean profile of the feeding gears, prevents filament snapping inside the drive housing, and ensures that machines like the flashforge adventure 5m maintain reliable material feeding over hundreds of operating hours.
Flashforge AD5X Extruder Pros and Cons
Pros
- High volumetric flow rates up to 32 mm³/s
- Pre-installed 0.4 mm high-flow hotend kit
- All-in-one hotend with precision metal tube
- Supports nozzle diameters from 0.25 mm to 0.8 mm
- Top cover interface allows quick V2 visual identification
Cons
- Strictly incompatible with V1 toolhead geometry
- Requires bed leveling calibration after installation
- Manual filament pulling risks drive gear clogs
Check Flashforge AD5X Extruder on Amazon
Is the Flashforge AD5X Extruder Worth It
For 3D printer owners troubleshooting chronic under-extrusion, motor clicking, or stripped gears on an existing V2 carriage, investing in the official Flashforge AD5X Extruder is the most reliable way to restore peak print quality. Instead of spending hours disassembling tiny internal gears, replacing fragile thermistor wires, or diagnosing internal heat creep, swapping the entire assembly provides a fresh, factory-calibrated mechanical baseline that guarantees structural alignment and optimal volumetric flow.
However, this replacement is strictly intended for users who have confirmed their printer accepts the V2 interface. If your printer utilizes the earlier V1 chassis geometry, purchasing this unit will lead to mounting frustration, as the physical parts are not cross-compatible. Furthermore, makers operating open-source custom Cartesian frames will find this proprietary toolhead unsuited for non-Flashforge mounting plates without extensive custom fabrication.
When matched with the correct V2 platform, this assembly provides exceptional value. The integration of a 32 mm³/s high-flow hotend with a precision metal tube ensures that your machine can run fast print speeds without sacrificing layer adhesion or fine detail, making it an indispensable replacement for serious hobbyists and small production shops alike.
Other Options to Consider
Redrex Dual Gear Ender 3 serves makers upgrading open-frame DIY bedslingers rather than enclosed Flashforge platforms, offering an all-metal dual gear drive feeder kit with two washers designed for machines like the Ender 3 V2, Pro, Neo, and CR10 series with motor shafts exceeding 20 mm.

Creality Official Ender 3 Extruder suits hobbyists who need an official gray aluminum metal drive feeder replacement for standard 1.75 mm filament setups on Ender-3, Pro, V2, and CR-10 style 3D printers rather than a high-speed integrated printhead.
High-Extrusion Force,with Filament Break Detection,Anti-Slip is tailored for Bambu Lab users needing a complete toolhead extruder replacement equipped with stainless steel dual gears, filament break detection, and anti-slip drive force specifically engineered for P1P and P1S printers.
FAQ
How can I tell if my printer requires the V1 or V2 extruder?
You can identify the correct version by checking the top cover interface shape on your printer toolhead. The V1 and V2 assemblies have distinctly different top profiles that allow visual verification without taking the toolhead apart.
Does this extruder assembly come with a hotend pre-installed?
Yes, this complete assembly includes a pre-installed 0.4 mm high-flow hotend kit capable of volumetric flow rates up to 32 mm³/s, featuring an integrated precision metal tube connecting the heater block and heat sink.
Why must I run bed leveling calibration after installing the extruder?
Even identical manufacturing batches have slight millimeter-level height variations between the nozzle tip and mounting points. Running automated bed leveling immediately after installation ensures the printer adjusts its Z-offset accurately to prevent bed damage or adhesion failures.
Can I print carbon fiber filament with the pre-installed nozzle?
The pre-installed 0.4 mm nozzle is primarily recommended for standard materials like PLA, PETG, and ABS. For carbon fiber, glass fiber, or other abrasive composite filaments, the manufacturer recommends installing a 0.6 mm or 0.8 mm nozzle to lower the risk of clogging.
Why is pulling filament out manually bad for this extruder?
Yanking filament out by hand rather than using the printer’s automated loading and unloading menu places excessive mechanical strain on the drive gears. This can pull unmelted plastic chunks into the drive teeth, causing severe clogs or stripped gear mechanisms.


